
ACGGOODS Virtual Convention: Organizer Guide
Welcome to the ACGGOODS Virtual Convention Organizer Guide! This manual will walk you through everything you need to know to successfully apply for, set up, and manage your virtual event.
Becoming an Organizer
To ensure a high-quality experience for both artists and attendees, the application process is strictly curated. Before applying, please ensure you meet BOTH of the following conditions:
Condition 1: Experience or Network (You must meet at least ONE of the following four criteria)
1. You have previously organized an in-person/offline artist convention or market.
2. You have previously organized an online collaborative art zine, art collaboration, sellers collaboration, or other forms of collaborative artist events.
3. You are the manager or administrator of a website featuring no less than 200 artists.
4. You are the manager or administrator of an artist community (e.g., Discord server, forum) with no less than 200 artists.
Condition 2: Availability & Responsibility You have sufficient time to dedicate to managing the event from start to finish. Organizers must be highly responsible and committed to seeing the convention through without abandoning the project midway.
Step 1: Apply to Host a Virtual Convention
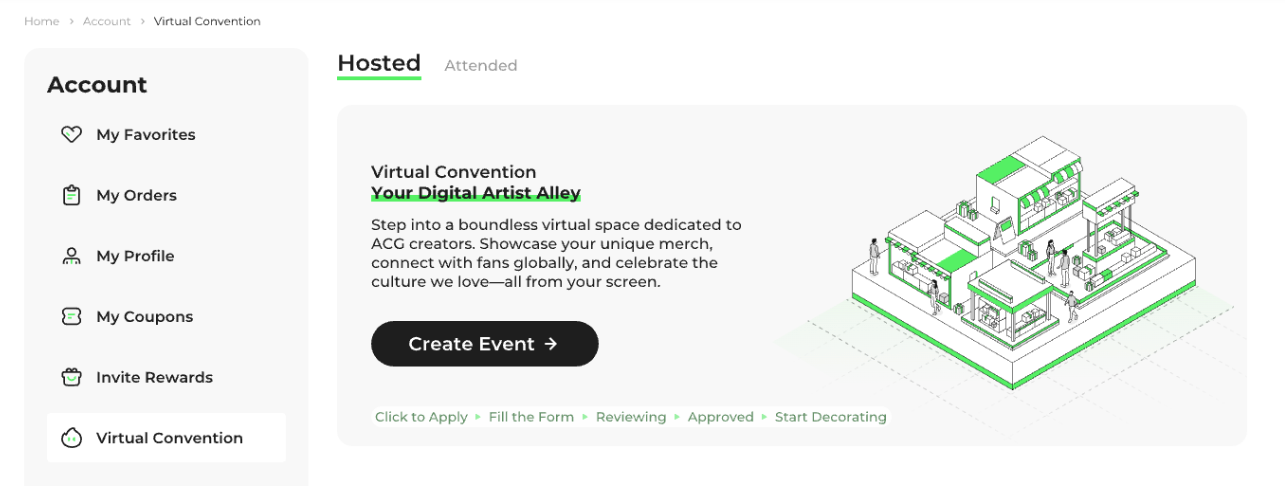
1. Locate the Application: Log in to your ACGGOODS account, click on your avatar, and select Virtual Convention.
2. Submit the Form: Fill out and submit your initial application.
3. Staff Review: Our team will review your application within 1-2 business days.
4. Provide Event Details: If approved, we will reach out to you via Discord. You will need to provide the information of your convention.
Once your event is fully approved, you will be able to access and manage your convention as an organizer by navigating to Personal Center > Virtual Convention.
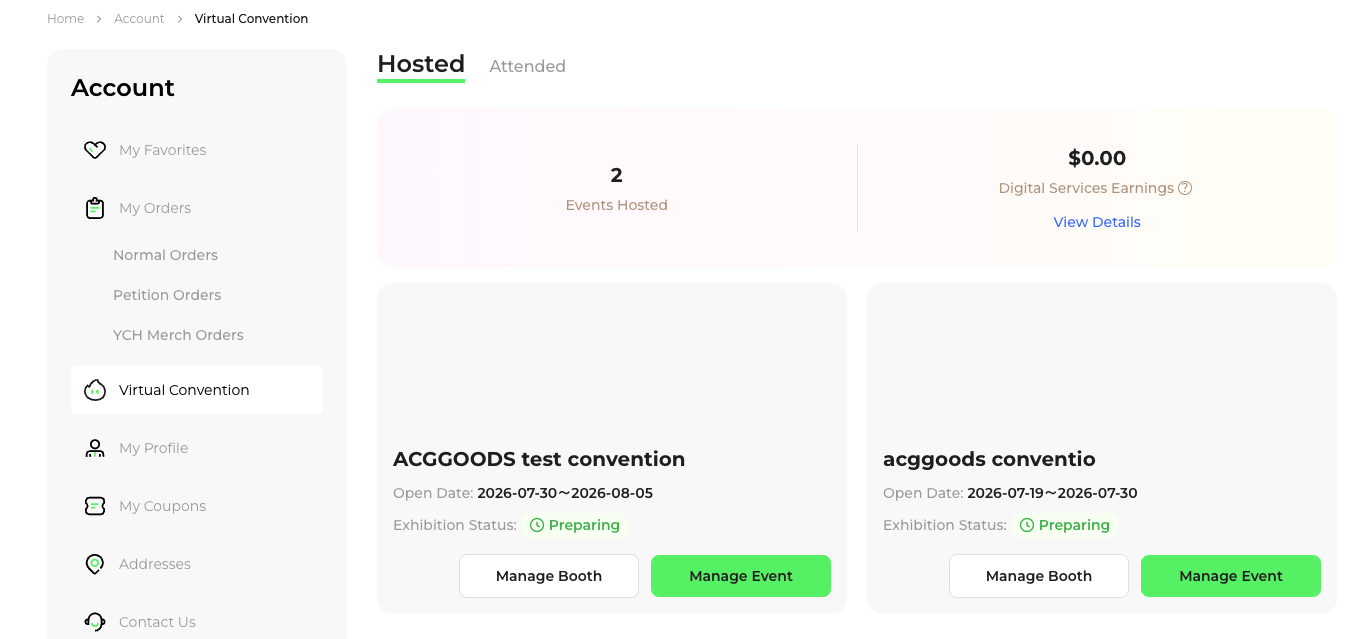
Step 2: Set Up Your Event Details
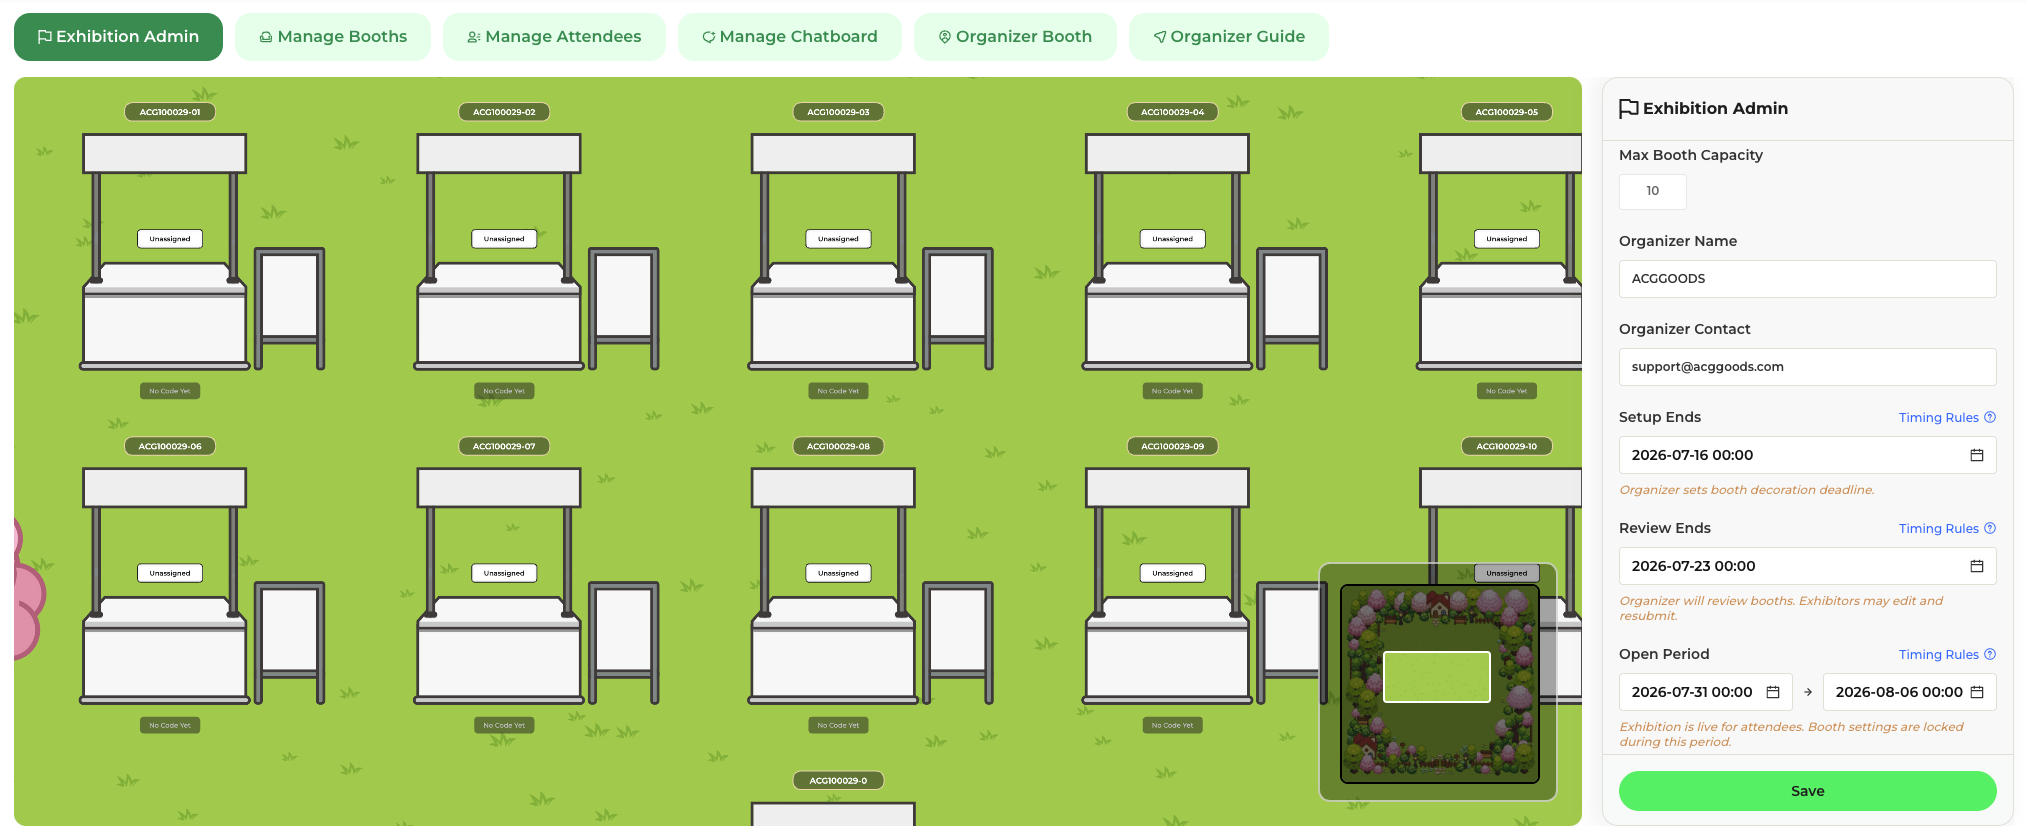
General Information
· Cover Image: The preview image visitors will see before joining. (Must meet sizing requirements).
· Exhibition Theme: The theme or subtitle for your event (can be changed anytime).
· Organizer Name & Contact: How attendees and artists will identify and communicate with you.
· Max Booth Capacity: Display only (unchangeable).
Schedule & Deadlines
Set the timeline for your event. All times are displayed in your local time, and the system automatically converts time zones based on each user’s location.
· Setup Ends: The deadline for artists to finish configuring their virtual booths.
· Review Ends: The deadline for you (the organizer) to review and approve all virtual booths.
· Open Period: The official start and end time for the convention itself.
Important Scheduling Rules: The timeline must follow this logical order: Setup Deadline < Review Deadline < Event Start Time. Any overdue actions by exhibitors will result in automatic disqualification from the event. These three deadlines can be modified anytime before you generate the Attendee Access Codes.
Rules & Layout
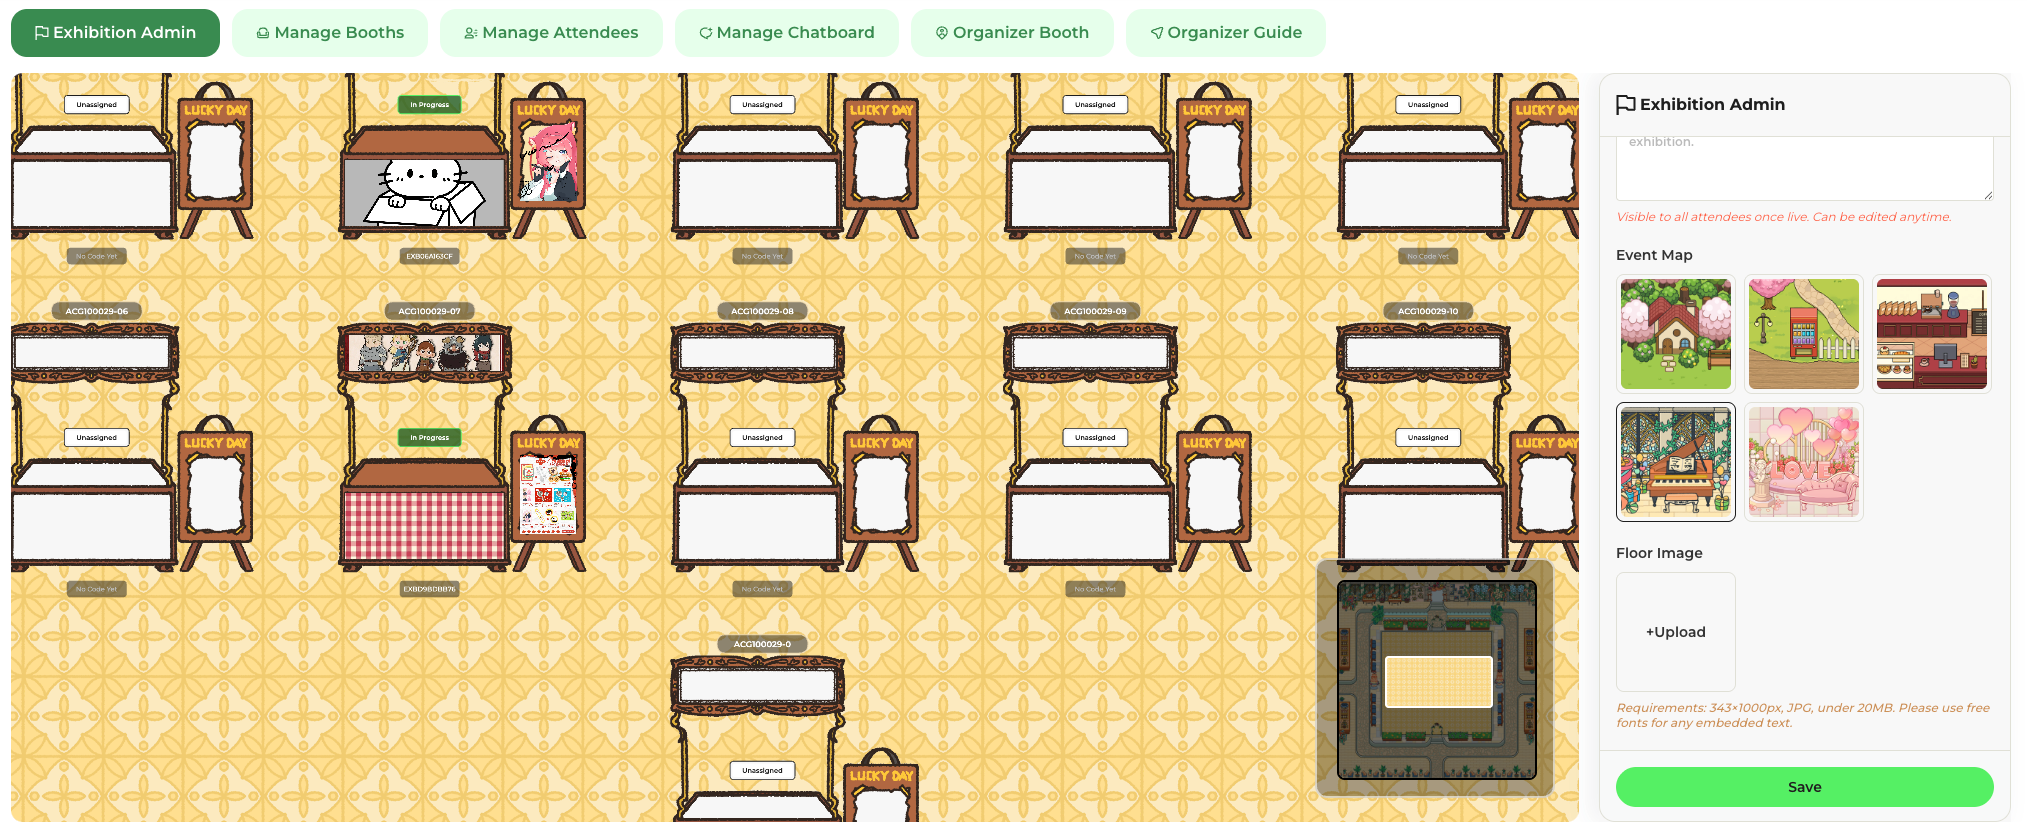
· Exhibitor Rules: Insert a document link containing guidelines and requirements for your participating artists.
· Event Rules: Public rules for attendees (e.g., shopping policies, code of conduct). This is visible to everyone once live and can be edited anytime.
· Event Map: Select a default map template based on your theme.
· Floor Image: Upload a custom-designed map if you prefer not to use the default templates (must follow size requirements).
Click Save once all information is configured, then proceed to the next section.
Step 3: Manage Booths & Exhibitors
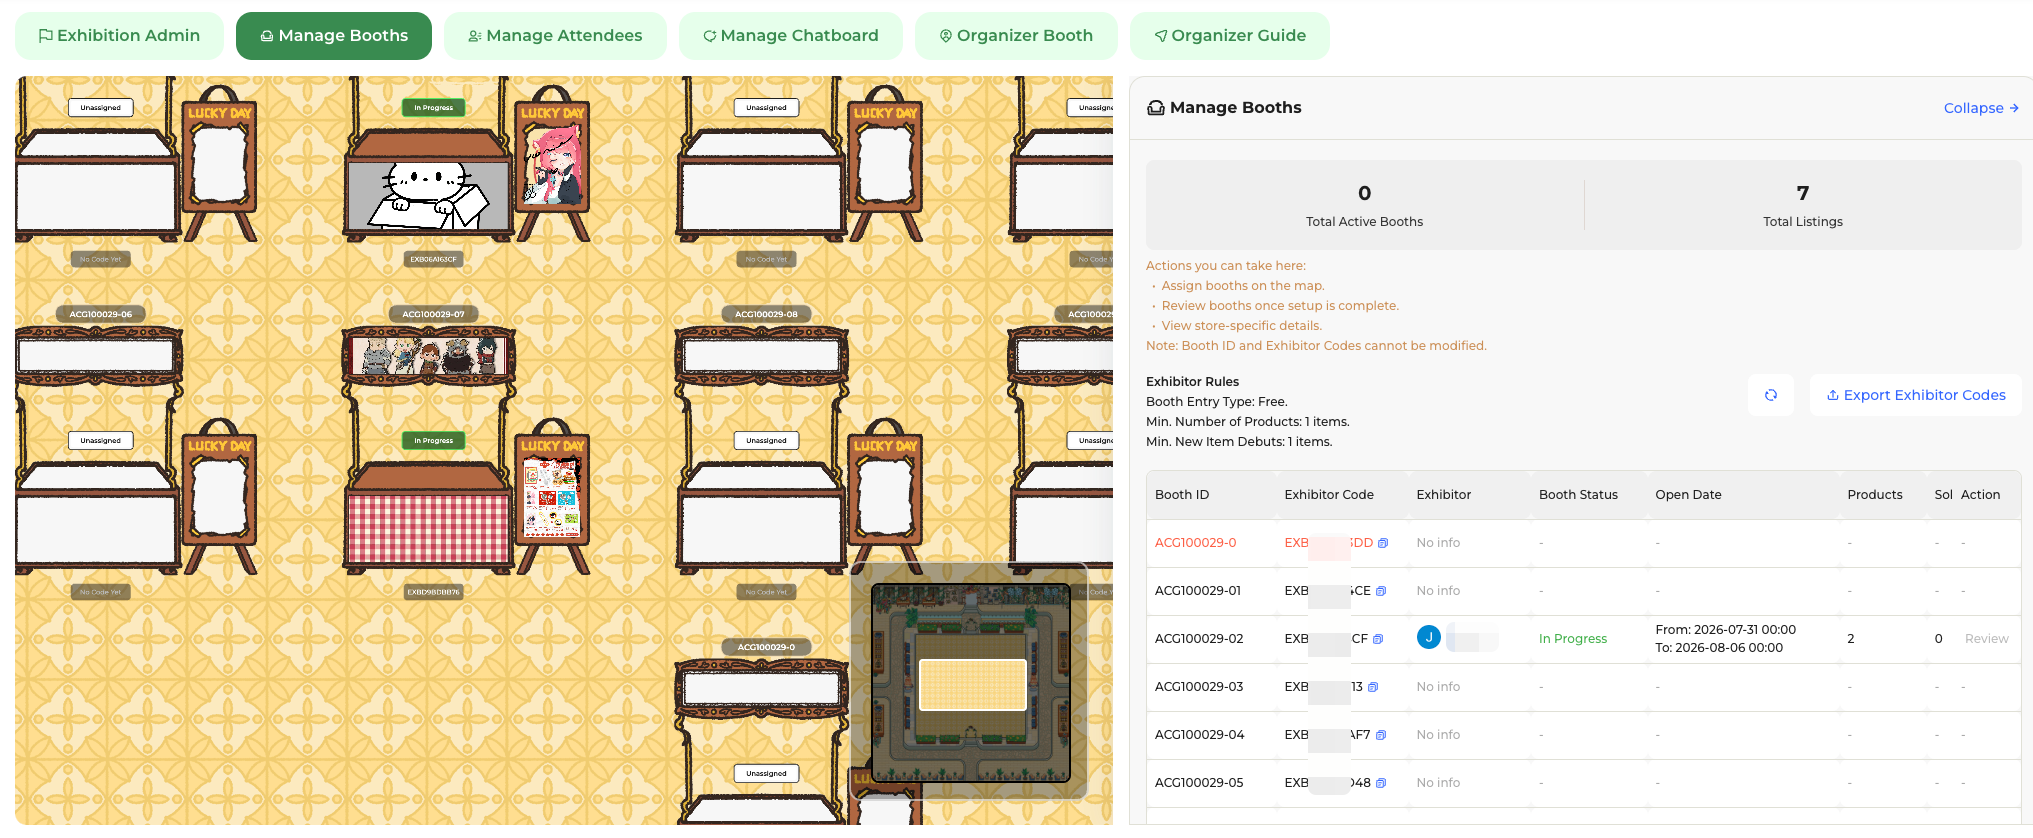
In the Manage Booths section, you can assign booth locations on the map, review completed booths, and view store-specific details.
Note: Booth IDs and Exhibitor Codes are system-generated and cannot be modified.
1. Generate Exhibitor Codes
Exhibitor Codes are required for artists to join your event. Choose your entry type:
· Free Entry: Invite artists to join your event at no cost.
· Paid Entry: Allow artists to purchase booth space. (Note: You must set up a payout account first to enable paid features).
2. Set Product Requirements
You can enforce listing rules for participating booths, or leave these fields blank if you have no limits:
· Minimum Total Products: Artists must list at least X items on their virtual booth.
· Minimum Debut/New Items: Artists must list at least X items that have never been set as “active” in their ACGGOODS store.
3. Distribute Codes
Confirm your settings to generate the codes. You will receive a list of Exhibitor Codes matching your Max Booth Capacity. (If they do not appear, click the Refresh icon). Export or copy these codes and send them to your approved artists.
4. Set Up the Organizer Booth
Your personal Organizer Booth ID will be highlighted in red or end in a zero (e.g., ACGxxxx-0). You must use your dedicated Exhibitor Code to claim it.
1. Navigate to Store Dashboard > Virtual Booth.
2. Create a new Virtual Booth and complete your setup.
3. Click Join Convention.
4. Enter your specific Exhibitor Code to register for the event.
5. Follow the prompts to go live.
Step 4: Manage Attendees
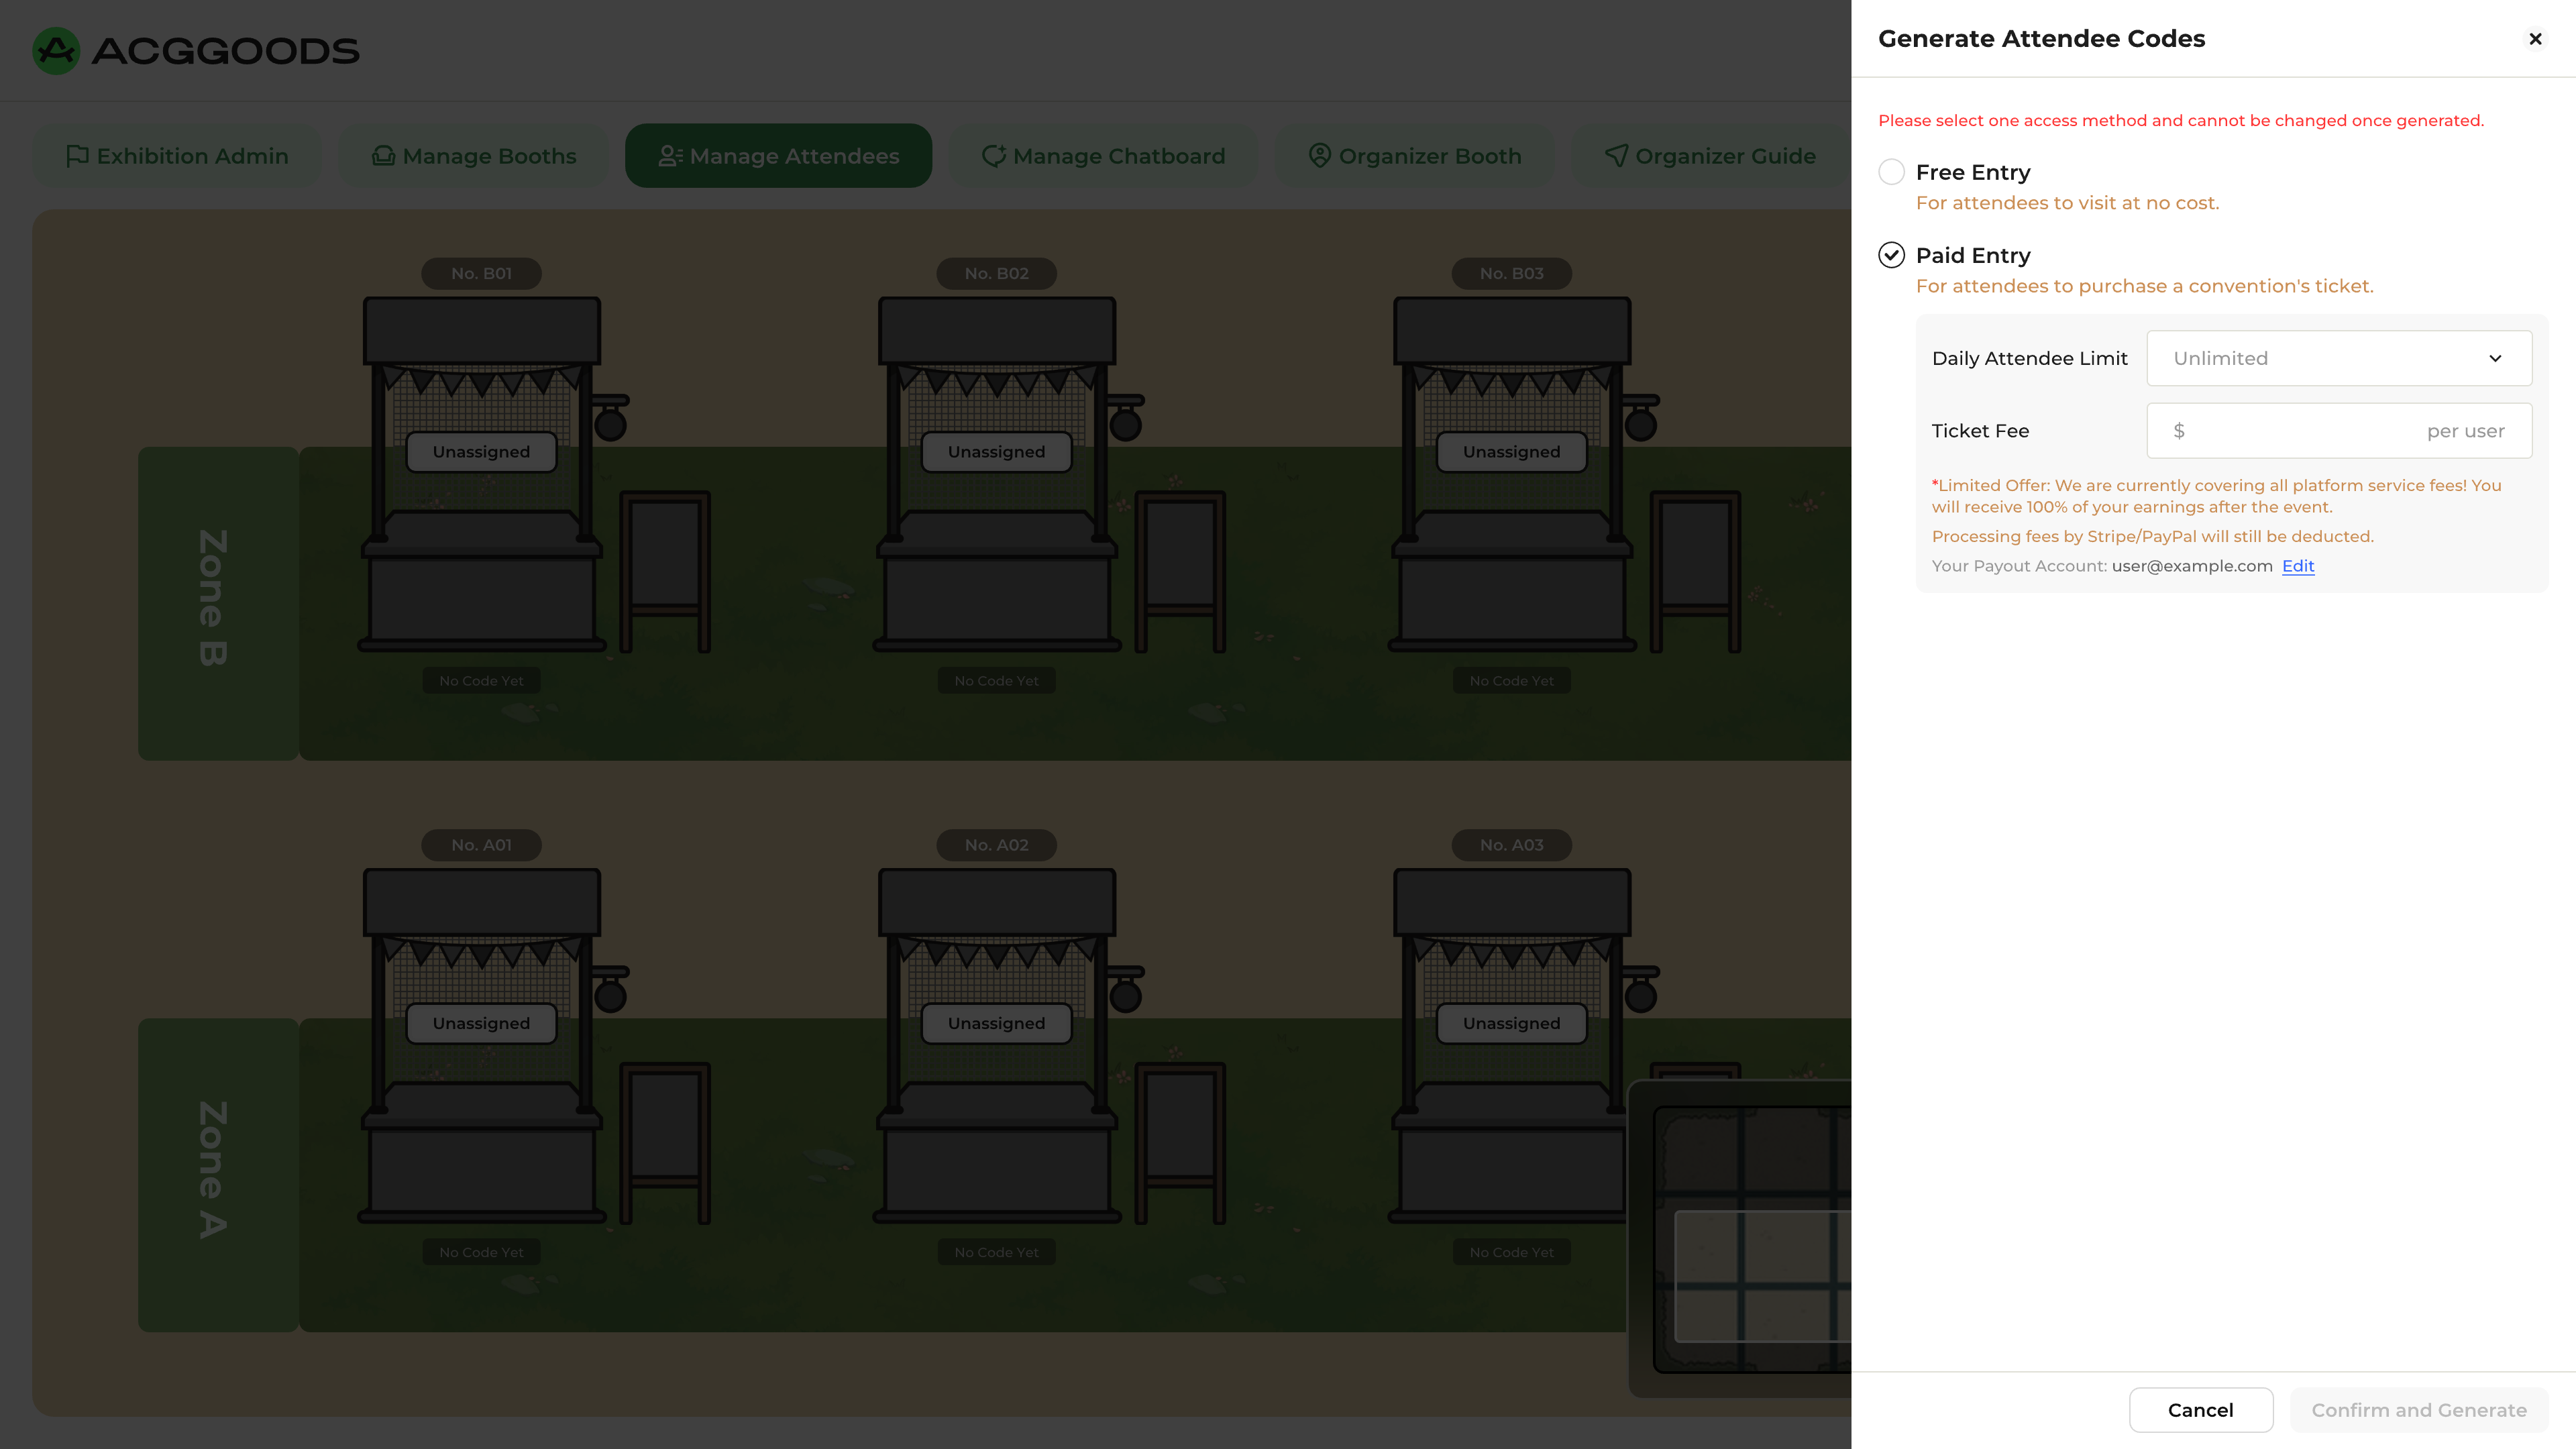
In the Manage Attendees section, you can generate the Attendee Access Codes (Visitor Codes) that allow fans to enter your convention.
Requirements to Generate Attendee Codes
1. All event details in the setup tabs must be completely filled out.
2. You must have at least 3 approved exhibitors fully set up. (The dashboard will track this progress, displaying a notice such as Current: 0/3 – Incomplete until the requirement is met).
Ticketing & Access Options
Once all settings are complete and the requirements above are met, you can configure the entry options for your visitors:
· Free Entry: Open to the public. Anyone with the virtual convention URL can access the event, browse the virtual booths, and purchase merch.
· Paid Entry: Gated access. Visitors are required to purchase a ticket before they can enter the convention.
Once your ticketing is configured, your event is fully set up! You and your participating artists are now ready to start promoting the convention and inviting supporters to join.
Step 5: Community & Chat Moderation
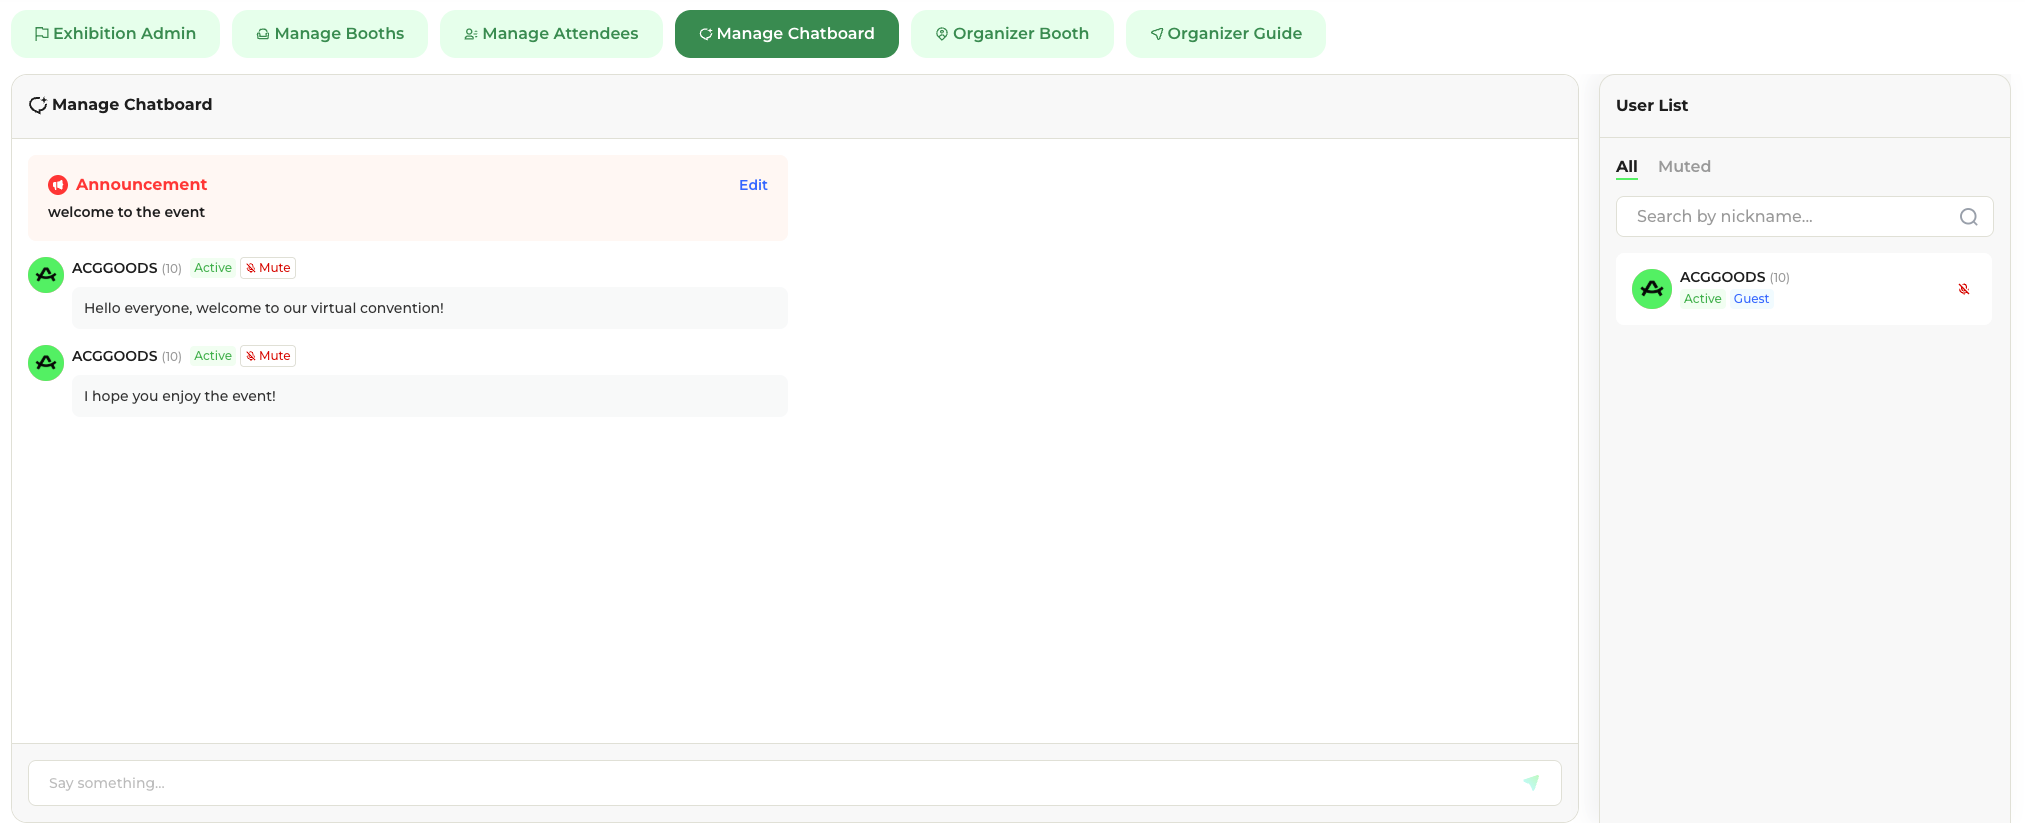
To keep attendees engaged, your virtual convention features a built-in, real-time chat system. As the organizer, you have full control over this environment.
Navigate to the Manage Chatboard section to configure and moderate your community space:
· Set Announcements: Keep attendees informed by highlighting important event updates or schedules.
· Moderate Real-Time: Ensure a safe and welcoming space for fans by muting or unmuting disruptive users at any time.
Hosting a virtual convention is an incredible way to connect talented artists with passionate supporters, and we are thrilled to have you build this community experience on ACGGOODS.
If you encounter any issues during the setup process, or if you have any questions along the way, our staff team is always here to help. Please don’t hesitate to reach out to us anytime at support@acggoods.com.